The new on-device vector database enables advanced AI applications on small restricted devices like mobile phones, Raspberry Pis, medical equipment, IoT gadgets and all the smart things around you. It is the missing piece to a fully local AI stack and the key technology to enable AI language models to interact with user specific data like text and images without an Internet connection and cloud services.
An AI Technology Enabler
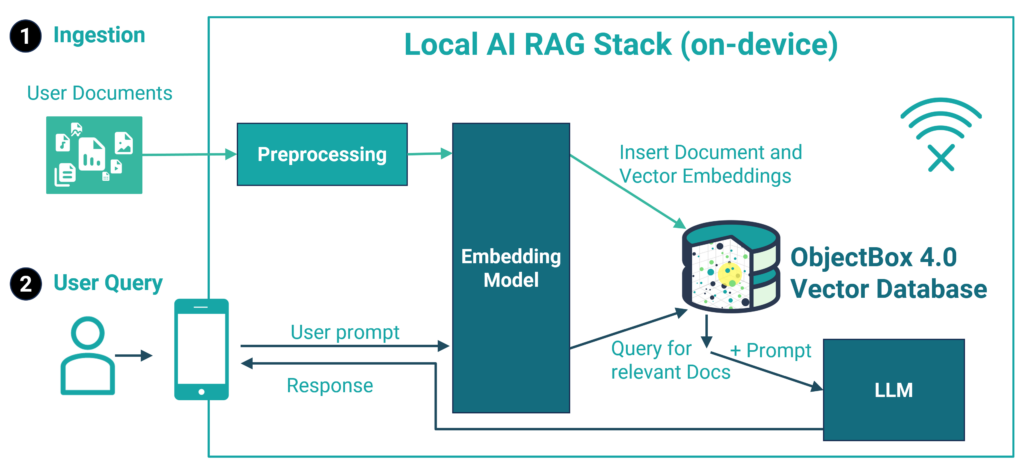
Recent AI language models (LLMs) demonstrated impressive capabilities while being small enough to run on e.g. mobile phones. Recent examples include Gemma, Phi3 and OpenELM. The next logical step from here is to use these LLMs for advanced AI applications that go beyond a mere chat. A new generation of apps is currently evolving. These apps create “flows” with user specific data and multiple queries to the LLM to perform complex tasks. This is also known as RAG (retrieval augmented generation), which, in its simplest form, allows one to chat with your documents. And now, for the very first time, this will be possible to do locally on restricted devices using a fully fledged embedded database.
What is special about ObjectBox Vector Search?
We know restricted devices. Where others see limitations, we see the potential and we have repeatedly demonstrated creating superefficient software for these. And thus maximizing speed, minimizing resource use, saving battery life and CO2. With this knowledge, we approached vector search in a unique way.
Efficient memory management is the key. The challenge with vector data is that on the one hand, it consumes a lot of memory – while on the other hand, relevant vectors must be present in memory to compute distances between vectors efficiently. For this, we introduced a special multi-layered caching that gives the best performance for the full range of devices; from memory-constrained small devices to large machines that can keep millions of vectors in memory. This worked out so well that we saw ObjectBox outperform several vector databases built for servers (open source benchmarks coming soon). This is no small feat given that ObjectBox still holds up full ACID properties, e.g. caching must be transaction-aware.
Also, keep in mind that ObjectBox is a fully capable database that allows you to store complex data objects along with vectors. From an ObjectBox data model point of view, a vector is “just” another property type. This allows you to store all your data (vectors along with objects) in a single database. This “one database” approach also includes queries. You can already combine vector search with other conditions. Note that some limitations still apply with this initial release. Full hybrid search is close to being finished and will be part of one of the next releases.
In short, the following features make ObjectBox a unique vector database:
Embedded Database that runs inside your application without latency
Vector search based is state-of-the-art HNSW algorithm that scales very well with growing data volume
HNSW is tightly integrated within our internal database. Vector Search doesn’t just run “on top of database persistence”.
With this deep integration we do not need to keep all vectors in memory.
Multi-layered caching: if a vector is not in-memory, ObjectBox fetches it from disk.
Not just a vector database: you can store any data in ObjectBox, not just vectors. You won’t need a second database.
Low minimum hardware requirements: e.g. an old Raspberry Pi comfortably runs ObjectBox smoothly.
Low memory footprint: ObjectBox itself just takes a few MB of memory. The entire binary is only about 3 MB (compressed around 1 MB).
Scales with hardware: efficient resource usage is also an advantage when running on more capable devices like the latest phones, desktops and servers.
ObjectBox additionally offers commercial editions, e.g. a Server Cluster mode, GraphQL, and of course, ObjectBox Sync, our data synchronization solution.
Why is this relevant? AI anywhere & anyplace
With history repeating itself, we think AI is in a “mainframe era” today. Just like clunky computers from decades before, AI is restricted to big and very expensive machines running far away from the user. In the future, AI will become decentralized, shifting to the user and their local devices. To support this shift, we created the ObjectBox vector database. Our vision is a future where AI can assist everyone, anytime, and anywhere, with efficiency, privacy, and sustainability at its core.
What do we launch today?
Today, we are releasing ObjectBox 4.0 with Vector Search for a variety of languages:
*) We acknowledge Python’s popularity within the AI community and thus have invested significantly in our Python binding over the last months to make it part of this initial release. Since we still want to smooth out some rough edges with Python, we decided to label Python an alpha release. Expect Python to quickly catch up and match the comfort of our more established language bindings soon (e.g. automatic ID and model handling).
One more thing: ObjectBox Open Source Database (OSS)
We are also very happy to announce that we will fully open source the core of ObjectBox. As a company we follow the open core model. Since we still have some cleaning up to do, this will happen in one of the next releases, likely 4.1.
“Release week”
With today’s initial releases, we are far from done yet. Starting next Tuesday, you can expect additional announcements from us. Follow us to get the news as soon as it is released.
What’s next?
This is our very first version of a “vector database”. And while we are very happy with this release, there are still so many things to do! For example, we will optimize vector search by adding vector quantization and integrate it more tightly with our data synchronization. We are also focusing on expanding our solution’s reach through strategic partnerships. If you think you are a good fit, let us know. And as always, we are very eager to get some feedback from you! Take care.
SQLite and SQLite alternatives - databases for the Mobile and IoT edge
Overview of SQLite and SQLite alternatives as part of the mobile / edge database market with a comprehensive comparison matrix (last updated autumn 2024)
Therefore, there is a renewed need for on-device databases like SQLite and SQLite alternatives to persist and manage data on edge devices. On top, due to the distributed nature of the edge, there is a need to manage data flows to / from and between edge devices. This can be done withEdge Databases that provide a Data Sync functionality (SQLite alternatives only, as SQLite doesn’t support this). Below, we’ll take a close look at SQLite and its alternatives with consideration of today’s needs.
Databases for the Edge
While being quite an established market with many players, the database market is still growing consistently and significantly. The reason is that databases are at the core of almost any digital solution, and directly impact business value and therefore never going out of fashion. With the rapid evolvements in the tech industry, however, databases evolve too. This, in turn, yields new database types and categories. We have seen the rise of NoSQL databases in the last 20 years, and more recently some novel database technologies, like graph databases and time-series databases, and vector databases.
With AI and accordingly vector databases being all the hype since 2022/2023, the database market is indeed experiencing fresh attention. Due to the speed with which AI is evolving, we’re however already leaving the “mainframe era of AI” and entering the distributed Edge AI space. With SQLite not supporting vector search and related vector database functions, this adds a new dimension to this ever-present topic. There is a need for local, on-device vector databases to support on-device AI that’s independent of an Internet connection, reliably fast, and keeps data on the device (100% private).
Both, the shift back from a centralised towards a decentralised paradigm, and the growing number of restricted devices call for a “new type” of an established database paradigm. SQLite has been around for more than 20 years and for good reason, but the current market shift back to decentralized computing happens in a new environment with new requirements. Hence, the need for a “new” database type, based on a well-established database type: “Edge databases”. Accordingly, a need for SQLite alternatives that consider the need for decentralized data flows and AI functionalities (depending on the use case of course; after all SQLite is a great database).
What is an Edge Database?
Edge databases are a type of databases that are optimised for local data storage on restricted devices, like embedded devices, Mobile, and IoT. Because they run on-device, they need to be especially resource-efficient (e.g. with regards to battery use, CPU consumption, memory, and footprint). The term “edge database” is becoming more widely-used every year, especially in the IoT industry. In IoT, the difference between cloud-based databases and ones that run locally (and therefore support Edge Computing) is crucial.
What is a Mobile Database?
We look at mobile databases as a subset of edge databases that run on mobile devices. The difference between the two terms lies mainly in the supported operating systems / types of devices. Unless Android and iOS are supported, an edge database is not really suited for the mobile device / smartphone market. In this article, we will use the term “mobile database” only as “database that runs locally on a mobile (edge) device and stores data on the device”. Therefore, we also refer to it as an “on-device” database.
What are the advantages and disadvantages of working with SQLite?
SQLite is a relational database that is clearly the most established database suitable to run on edge devices. Moreover, it is probably the only “established” mobile database. It was designed in 2000 by Richard Hipp and has been embedded with iOS and Android since the beginning. Now let’s have a quick look at its main advantages and disadvantages:
Advantages
Disadvantages
20+ years old (should be stable ;))
Toolchain, e.g. DB browser
No dependencies, is included with Android and iOS
Developers can define exactly the data schema they want
Full control, e.g. handwritten SQL queries
SQL is a powerful and established query language, and SQLite supports most of it
Debuggable data: developers can grab the database file and analyse it
20+ years old ( less state-of-the-art tech)
Using SQLite means a lot of boilerplate code and thus inefficiencies ( maintaining long running apps can be quite painful)
No compile time checks (e.g. SQL queries)
SQL is another language to master, and can impact your app’s efficiency / performance significantly…
The performance of SQLite is unreliable
SQL queries can get long and complicated
Testability (how to mock a database?)
Especially when database views are involved, maintainability may suffer with SQLite
What are the SQLite alternatives?
There are a bunch of options for making your life easier, if you want to use SQLite. You can use an object abstraction on top of it, an object-Relational-Mapper (ORM), for instance greenDAO, to avoid writing lots of SQL. However, you will typically still need to learn SQL and SQLite at some point. So what you really want is a full blown database alternative, like any of these: Couchbase Lite, Interbase, LevelDB, ObjectBox, Oracle Berkeley DB, Mongo Realm, SnappyDB, SQL Anywhere, or UnQLite.
While SQLite really is designed for small devices, people do run it on the server / cloud too. Actually, any database that runs efficiently locally, will be highly efficient on big servers too, making them a sustainable lightweight choice for some scenarios. However, for server / cloud databases, there are a lot of alternatives you can use as a replacement like e.g. MySQL, MongoDB, or Cloud Firestore.
Bear in mind that, if you are looking to host your database in the cloud with apps running on small distributed devices (e.g. mobile apps, IoT apps, any apps on embedded devices etc.), there are some difficulties. Firstly, this will result in higher latency, i.e. slow response-rates. Secondly, the offline capabilities will be highly limited or absent. As a result, you might have to deal with increased networking costs, which is not only reflected in dollars, but also CO2 emissions. On top, it means all the data from all the different app users is stored in one central place. This means that any kind of data breach will affect all your and your users’ data. Most importantly, you will likely be giving your cloud / database provider rights to that data. (Consider reading the general terms diligently). If you care about privacy and data ownership, you might therefore want to consider a local database option, as in an Edge Database. This way you can decide, possibly limit, what data you sync to a central instance (like the cloud or an on-premise server).
SQLite alternatives Comparison Matrix
To give you an overview, we have compiled a comparison table including SQLite and SQLite alternatives. In this matrix we look at databases that we believe are apt to run on edge devices. Our rule of thumb is the databases’ ability to run on Raspberry Pi type size devices. If you’re reading this on mobile, click here to view the full matrix.
Edge
Database
Short description
License / business model
Android / iOS*
Type of data stored
Central Data Sync
P2P Data Sync
Offline Sync (Edge)
Data level encryption
Flutter / Dart support
Vector Database (AI support)
Minimum Footprint size
Company
SQLite
C programming library;
probably still 90% market share in the small devices space (personal
assumption)
Embedded / portable database
with P2P and central synchronization (sync) support; pricing upon
request; some restrictions apply for the free version. Secure SSL.
Partly proprietary, partly
open-source, Couchbase Lite is BSL 1.1
Is there anything we’ve missed? What do you agree and disagree with? Please share your thoughts with us via Twitter or email us on contact[at]objectbox.io.
AI anywhere and anytime - free from Internet dependencies & 100% private
Edge AI is an often overlooked aspect of AI’s natural evolution. It is basically the move of AI functionalities away from the cloud (or powerful server infrastructure) towards decentralized (typically less powerful) devices at the network’s edges, including on mobile phones, smartwatches, IoT devices, microcontrollers, ECUs, or simply your local computer. Or in more broadly speaking: “Edge AI” means AI that works directly on-device, “local AI“.
Therefore, Edge AI apps work independently from an internet connection, offline as well as online. So, they are ideal for low, intermittent, or no connectivity scenarios. They are reliably available, more sustainable, and – of course – way faster on-device than anything hosted in the cloud. On-device AI apps can empower realtime AI anytime and anyplace.
The importance of vector databases for AI applications
To enable powerful on-device AI applications, the on-device (edge) technology stack needs local vector databases. So, before diving deeper into Edge AI, we’ll dive into vector databases first. Jump this section, if you are already familiar with them.
What is a vector database?
Just as SQL databases handle data in rows and columns, graph databases manage graphs, object databases store objects, vector databases store and manage large data sets of vectors, or more precisely, vector embeddings. Because AI models work with vector embeddings, vector databases are basically the databases for AI applications. Vector databases offer a feature set of vector operations, most notably vector similarity search, that makes it easy and fast to work with vector embeddings and in conjunction with AI models.
When and why do you need a vector database?
Given the significance of vector embeddings (vectors) for AI models, particularly Large Language Models (LLMs) and AI applications, vector databases are now integral to the AI technology stack. They can be used to:
Train AI models (e.g. ML model training, LLM training) Vector databases manage the datasets large models are trained on. Training AI models typically entails finding patterns in large data sets. Training ML models often involves finding patterns in large datasets. Vector databases significantly speed up identifying patterns and finding relationships by enabling efficient retrieval of similar data points.
Speed up AI model / LLM responses Vector databases use various techniques to speed up vector retrieval and similarity search, e.g. compression and filtering. They accelerate both model training and inference, thus, enhancing the performance of generative AI applications. By optimizing vector retrieval and similarity search, vector dbs can enhance the efficiency and scalability of AI applications that rely on high-dimensional data representations
Add long-term memory to AI models and LLMs Vector databases add long term memory to AI applications in two ways: They persist the history to 1. continue on the tasks or conversation later as needed and 2. to personalize and enhance the model for better-fitting results.
Enable Multimodel Search Vector databases serve as the backbone to jointly analyze vectors from multimodal data (text, image, audio, and video) for unified multimodal search and analytics. The use of a combination of vectors from different modalities enables a deeper understanding of the information, leading to more accurate and relevant search results.
Enhancing LLMs responses, primarily “RAG” With a vector database, you have additional knowledge to enhance the quality of a model’s responses and to decrease hallucinations; real-time updates, as well as personalized responses, become possible.
Perform Similarity Search / Semantic Retrieval Vector databases are the heart and soul of semantic retrieval and similarity search. Vector search often works better than „full-text search“ (FTS) as it finds related objects that share the same semantics/meaning instead of matching the exact keyword. Thus, it is possible to handle synonyms, ambiguous language, as well as broad and fuzzy queries.
Cache: Reduce LLM calls Vector databases are used to cache similar queries and responses can be used as a lookup prior to calling the LLM. This saves resources, time, and costs.
The shift to on-device computation (aka Edge Computing)
Edge Computing is in its essence a decentralized computing paradigm and based on Edge Computing, AI on decentralized devices (aka Edge AI) becomes possible. Note: In computing, we have regularly seen shifts from centralized to decentralized computing and back again.
What is Edge Computing?
Our world is decentralized. Data is produced and needed everywhere, on a myriad of distributed devices like smartphones, TVs, robots, machines, and cars – on the so-called “edge” of the network. It would not only be unsustainable, expensive, and super slow to send all this data to the cloud, but it is also literally unfeasible. So, much of this data simply stays on the device it was created on. To harness the value of this data, the distributed “Edge Computing” paradigm is employed.
When and why do you need Edge Computing?
Edge Computing stores and processes data locally on the device it was created on, e.g. on IoT, Mobile, and other edge devices. In practice, Edge Computing often complements a cloud setup. The benefits of extending the cloud with on-device computing are:
Data ownership/privacy Cloud apps are fundamentally non-private and limit the user’s control over their own data. Edge Computing allows data to stay where it is produced, used, and where it belongs (with the user/on the edge devices). It therefore reduces data security risks, and data privacy and ownership concerns.
Bandwidth constraints and the cost of data transmission Ever growing data volumes strain bandwidth and associated network/cloud costs, even with advanced technologies like 5G/6G networks. Storing data locally in a structured way at the edge, such as in an on-device database, is necessary to unlock the power of this data. At the same time, some of this data can still be made available centrally (in the cloud or on an on-premise server), combining the best of both worlds.
Fast response rates and real-time data processing Doing the processing directly on the device is much faster than sending data to the cloud and waiting for a response (latency). With on-device data storage and processing, real-time decision making is possible.
Sustainability By reducing data overhead and unnecessary data transfers, you can cut down 60-90% of data traffic, thereby significantly reducing the CO2 footprint of an application. A welcome side effect is that this also lowers costs tremendously.
Edge AI needs on-device vector databases
Every megashift in computing is empowered by specific infrastructure software, like e.g. databases. Shifting from AI to Edge AI, we still see a notable gap: On-device support for vector data management (the typical AI data) and data synchronization capabilities (to update AI models across devices). To efficiently support Edge AI, vector databases that run locally, on edge devices, are as crucial as they are on servers today. So far, all vector databases are cloud / server databases and cannot run on restricted devices like mobile phones and microcontrollers. But moreover, they often don’t run on more capable devices like standard PCs either, or only with really bad performance. To empower everyday life AI that works anytime all around us, we therefore need a database that can run performantly on a wide variety of devices on the edge of the network.
In fact, vector databases may be even more important on the edge than they are in cloud / server environments. On the edge, the tradeoff between accuracy and performance is a much more delicate line to walk, and vector databases are a way to balance the scales.
On-device AI: Use Cases and why they need an Edge Vector Database
Seamless AI support where it is needed most, on everyday devices and all the things around us needs an optimized local AI tech stack that runs efficiently on the devices. From private home appliences to on-premise devices in business settings, medical equipment in healthcare, digital infrastructure in urban environments, or just mobile phones, you name it: To empower these devices with advanced AI applications, you need local vector databases. From the broad scope of AI’s impact in various fields, let’s focus on some specific examples to make it more tangible: the integration of AI within vehicle onboard systems and the use of Edge AI in healthcare.
Vehicle onboard AI and edge vector databases – examples
Imagine a car crashing because the car software was waiting on the cloud to respond – unthinkable. The car is therefore one of the most obvious use cases for on-device AI.
Any AI application is only as good as its data. A car today is a complex distributed system on wheels, traversing a complex decentralized world. Its complexity is permanently growing due to increased data (7x more data per car generation), devices, and the number of functions. Making use of the available data inside the car and managing the distributed data flows is therefore a challenge in itself. Useful onboard AI applications depend on an on-device vector database (Edge AI). Some in-car AI application examples:
Advanced driver assistance systems (ADAS) ADAS benefit in a lot of areas from in-vehicle AI. Let’s look, for example, at driver behaviour: By monitoring the eye movements and head, ADAS can determine when the driver shows any signs of unconcentrated driving, e.g., drowsiness. Using an on-device database, the ADAS can use the historic data, the realtime data, and other car data, like, e.g., the driving situation, to deduce its action and issue alerts, avoid collisions, or suggest other corrective measures.
Personalized, next-gen driver experience With an on-device database and Edge AI, an onboard AI can analyze driver behavior and preferences over a longer period of time and combine it with other available data to optimize comfort and convenience for a personalised driving experience that goes way beyond a saved profile. For example, an onboard AI can adjust the onboard entertainment system continually to the driver’s detected state, the driving environment, and the personal preferences.
Applications of Edge AI in Healthcare – examples
Edge Computing has seen massive growth in healthcare applications in the last years as it helps to maintain the privacy of patients and provides the reliability and speed needed. Artificial intelligence is also already in wide use making healthcare smarter and more accurate than ever before. With the means for Edge AI at hand, this transformation of the healthcare industry will become even more radical. With Edge AI and on-device vector databases, healthcare can rely on smart devices to react in realtime to users’ health metrics, provide personalized health recommendations, and offer assistance during emergencies – anytime and anyplace, with or without an Internet connection. And while ensuring data security, privacy, and ownership. Some examples:
Personalized health recommendations By monitoring the user’s health data and lifestyle factors (e.g. sleep hours, daily sports activity) combined with their historic medical data, if available, AI apps can help detect early signs of health issues or potential health risks for early diagnosis and intervention. The Ai app can provide personalized recommendations for exercise, diet, or medication adherence. While this case does not rely on real-time analysis and fast feedback as much as the previous example, it benefits from an edge vector database in regards to data privacy and security.
Point of care realtime decision support By deploying AI algorithms on medical devices, healthcare providers can receive immediate recommendations, treatment guidelines, and alerts based on patient-specific data. One example of where this is used with great success, is in surgeries. An operating room, today, is a complex environment with many decentralized medical devices that requires teams to process, coordinate, and act upon several information sources at one time. Ultra-low latency streaming of surgical video into AI-powered data processing workflows on-site, enables surgeons to make better informed decisions, helps them detect abnormalities earlier, and focus on the core of their task.
Edge AI: Clearing the Path for AI anywhere, anytime
For an AI-empowered world when and where needed, we still have to overcome some technical challenges. With AI moving so fast, this seems however quite close. The move into this new era of ubiqutuous AI needs Edge AI infrastructure. Only when Edge AI is so easy to implement and deploy as cloud AI, will we see the ecosystem thriving and bringing AI functionalities that work anytime and anyplace to everyone. An important corner stone will be on-device vector databases as well as new AI frameworks and models, which are specifically designed to address Edge Computing constraints. Some of the corresponding recent advances in the AI area include “LLM in a Flash” (a novel technique from Apple for effective inference of LLMs at the edge) and Liquid Neural Networks (designed for continuous learning and adaptation on edge devices). There’s more to come, follow us to keep your edge on Edge AI News.
ObjectBox was a purely disk-based database until now. Today, we added in-memory storage as a non-persistent alternative. This enables additional use cases requiring temporary in-process data. It’s also great for testing.
Disk + In-memory: simply use the best of both worlds
When opening a new database, you can now choose if the database is stored on disk or in-memory. Because this is a per database option, it is possible to use both types in your application. It’s very simple to use: when opening the store, instead of providing an actual directory, provide an pseudo-directory as a string with the prefix “memory:”. After the prefix, you pick a name for the database to address it, e.g. “memory:myApp”.
Note: in-memory databases are kept after closing a store; they have to be explicitly deleted or are automatically deleted if the creating process exists.
So, what are typical in-memory database use cases?
Caching and temporary data
If data is short lived, it may not make sense involving the disk with persistent storage. Unlike programming language containers like maps and hash tables, caches built on in-memory databases have advanced querying capabilities and support complex object graphs. For example, databases allow lookups by more than one key (e.g. ID, name and URL). Or deleting certain entries using a query. As ObjectBox is closely integrated with programming languages, putting and getting an object are typically just “one liners” similar to map and hash table containers.
Bringing “online-only” and “offline-first” apps closer together
Let’s say you want to start simple by creating an application that always fetches the data from the cloud. You can put that data in an in-memory database (similar to the caching approach above). The data is available (“cached”) for all app components via a common Box-based API, which is already great. But let’s say later on, you want to go “offline-first” with your app to respond quicker to user requests and save cloud and/or mobile networking operator (MNO) costs. Since you are already using the Box-based API, you simply “turn on persistence” by using a disk-based database instead.
Performance and app speed
Shouldn’t this be the first point in the list? Well, ObjectBox did already operate at “in-memory speed” for mostly-read scenarios even though it used a disk-based approach. So, do not expect huge improvements for reads. Writes (Create, Update, Delete) are different though: to fully support ACID, a disk-based database must wait on the disk to fully complete the operation. Contrary to this, an in-memory database can immediately start the next transaction.
Diskless devices
Some small devices, e.g. sensors, may not have a disk or an accessible file system. This update makes it possible to run ObjectBox here too. This can be an interesting combination with ObjectBox Sync and automatically getting data from another device.
Testing
For example in unit tests, you can now spin up ObjectBox databases even faster than before, e.g. opening and closing a store in less than a millisecond.
“Transactional memory”
In concurrent (multi-threaded) scenarios, you may want to provide transactional consistent views (or “checkpoints”) of your data. Let’s say bringing the data from one consistent view to another is a rather complex operation involving the modification of several objects. In such cases locking may be a concern (complex or blocking), so having an in-memory database may be a nice alternative. It “naturally” offers transactions and thus transactional safe view on data. Thus, you can always read consistent data without worrying about data being modified at the same time. Also, you never have to wait for a modifying thread to finish.
What’s next?
This is only our first version of our in-memory store. Consider it as an starting point for more to come:
Performance: to ship early, we made rather big performance tradeoffs. At this point, starting a new write transaction will copy all data internally, which of course is not great for performance. A future version will be a lot smarter than that.
Persistence: While this version is purely in-memory without persistence, we want to add persistence gradually. This will include a write-ahead-log (WAL) and snapshots. This constellation may become even preferable over the default disk-base store for some scenarios.
We are currently rolling out the in-memory feature to all language supported by ObjectBox:
ObjectBox Admin (Docker container) allows you to analyze ObjectBox databases that run on desktop and server machines. Releasing ObjectBox Admin as a standalone Docker image makes it possible to run Admin on a larger number of platforms.
ObjectBox Admin is available as a Linux x86_64 Docker image, which runs on all common platforms including Windows and macOS. We offer a convenience script (objectbox-admin.sh) but it’s also simple enough to run it via plain Docker. See the docs for details, or get started by following this short tutorial.
Data Browser
The ObjectBox Admin Web App comprises a menu on the left (Data, Schema, Status, GraphQL…) and the corresponding content pane on the right-hand side.
The data browser provides a table of objects of a specific type. By clicking on the Type we can select an entity type for viewing its entity objects.
Next to the type selection is a small filter icon (the dashed triangle right of the type selection).
When selected, a query editor pops up that allows to filter data by adding a Property/Operator/Value expression.
When finished, click the check mark, and the data table gets updated with an active filter.
At the bottom, you will find a download link that exports the objects of the currently viewed box in JSON format.
Schema Browser
You can get a detailed list of elements that make up an object type in the “Schema” pane.
In accordance with the “Data” pane, you can click on Type to select the schema of a specific entity type of your database.
Status
Base level database and ObjectBox Admin information can be viewed on the “Status” pane.
GraphQL
The Docker-version of ObjectBox Admin offers a pane to query the database using GraphQL.
Data is decentralized. Cloud computing is centralized. Forcing the decentralized world into the centralized cloud topology is not only inefficient, but also economically, ecologically and socially wasteful – and sometimes simply impossible.
To drive digitization and extract value from decentralized data, we need to give the cloud an edge, or more precisely add Edge Computing. Edge computing is a decentralized topology for storing and processing data as close as possible to the data source, i.e., the place where the data is produced, at the edge of the network.
Valuable data is increasingly generated in a decentralized manner – outside traditional and centralized data centers and cloud environments. The dominance of centralized cloud computing approaches slows down digitization and the use of this existing decentralized data. Therefore, according to Gartner (2023) “Edge computing is integral to digital transformation”, and we need infrastructure technologies for the edge that enable developers to quickly and reliably work with decentralized edge data.
Edge Database (Foundation for Edge Data Management) is a new type of database that addresses these requirements. Developers need fast local data persistence and decentralized data flows (Data Sync) to implement edge solutions. Edge Databases solve these core edge functionalities out-of-the-box, allowing application developers to quickly implement edge solutions.
By 2030, 30+ billion IoT devices will be creating ~4.6 trillion GB of data per day. The growing numbers of devices and data volume, variety, and velocity, as well as bandwidth infrastructure limitations, make it infeasible to store and process all data in a centralized cloud. On top, new use cases come with new requirements, a centralized cloud infrastructure cannot meet. For example, soft and hard response rate requirements, offline-functionality, and security and data protection regulations.
These trends accelerate the shift away from centralized cloud computing to a decentralized edge computing topology. Edge computing refers to decentralized data processing at the “edge” of the network. For example, in a car, on a machine, on a smartphone, or in a building. Hardware specifications do not capture the definition of an “edge device”. The crucial point is rather the decentralized use of data at, or as close as possible to, the data source.
Edge computing itself is not a technology but a topology, and according to McKinsey, one of the top growing trends in tech in 2021. The technologies needed to implement the edge computing topology are still inadequate. More specifically, there is a gap in basic “core” edge technologies, so-called “software infrastructure”. This gap is one of the main reasons for the failure of edge projects.
Needed: Infrastructure Software for Edge Computing
With computing shifting to the edge of the network, the needs of this decentralized topology become clear:
Need for fast local data storage
→ i.e. a machine on the factory floor collects data on stiffness, friction, pressure points. There is limited space on the device, and typically no connection to the Internet. Even with an Internet connection, high data rates quickly push the available bandwidth, as well as associated networking / cloud costs, to the limit. To be able to use this data, it must be persisted in a structured manner at the edge, e.g. stored locally in a database.
Need for reliable on-device data flows
→ i.e. the car is an edge device consisting of many control units. Therefore, data must be stored on multiple control units. In order to access and use the data within several of the control units of the car, the data must be selectively synchronized between the devices. A centralized structure and thus a single point of failure is unthinkable.
Need for edge-to-edge-to-cloud data flows
→ i.e. in a manufacturing hall: Typically, you will find any number of diverse devices from sensors to brownfield to greenfield devices, and no internet connectivity. At the same time, there are diverse employee devices such as tablets or smartphones, as well as central PCs, and a cloud. To extract value from the data, it must be available in raw, aggregated, or summary form, in different places. This means it needs to be synchronized efficiently and selectively, with possible conflicts resolved.
Need for flexible edge data management
→ e.g. with the rise of IoT, time-series data have become common. However, time series data alone is usually not sufficient, and needs to be combined with other data structures (like objects) to add value. At the same time, a push to standardize data formats in industries (e.g. VSS in automotive or Umati in Industrial IoT) requires that the database supports flexible data structures.
Developing solutions without software infrastructure on an individual level is possible, but has many drawbacks:
Custom in-house implementations are cumbersome, slow, costly, and typically scale poorly. Oftentimes, applications or certain feature sets become unfeasible to deliver because of the lack of core software infrastructure. Legacy code and individual workarounds create problems over the lifetime of a product. Instead of a thriving ecosystem, only a few big players are able to implement edge solutions. Innovation and creativity are limited. An edge database is part of the solution and enables the entire edge ecosystem to build edge applications faster, cheaper and more efficiently.
What is an Edge Database?
An Edge Database is a type of database specifically tailored to the unique requirements of the Edge Computing topology. Edge Databases run directly on-device, locally, and make it easy for app developers to access decentralized data from edge devices when and where needed. Using an Edge Database removes the burden of implementing ways to synchronize data, which is non-trivial, time-consuming, risky, and brings ongoing maintenance needs. Let’s look at this in more detail:
First, an Edge Database is optimized for resource efficiency (CPU, memory, …) and performance on resource-constrained devices (embedded devices, IoT, mobile). It has a small footprint of a few megabytes max. Traditional databases such as MySQL or MongoDB are too large and slow for typical edge devices, making them unsuitable for computing at the edge. Nevertheless, with integrations like the one between ObjectBox and MongoDB, developers can now combine ObjectBox’s on-device efficiency and offline-first capabilities of Edge Databases with MongoDB’s scalable cloud platform to enable seamless, bi-directional synchronization between the edge and the cloud.
An edge device without data flows to/from other devices is just a data island with very limited utility. Accordingly, an Edge Database must support the management of decentralized data flows. There is no more efficient way than at the database level. This ideally includes a range of conflict resolution strategies due to the decentralized and multi-directional structure of the Edge.
Last not least, data security is of growing importance and data in motion needs to be protected. Data at rest is on a database level often protected by the OS and therefore less of a concern for most applications.
When do you need an Edge Database?
Most IoT applications need to store and synchronize data. An Edge Database is always useful when functions / applications are planned that:
should work offline and independent of an internet connection
need to guarantee fast response times
work with a lot of, possibly high-frequency data
need to serve many devices at the same time
need historical data
In addition, developers also often decide to use an Edge Database to save time and nerves, or to be able to react quickly and flexibly to future requirements.
Edge Database Use Case Example in Manufacturing
Today, you can find everything from low-frequency brownfield devices to high-frequency greenfield devices on a factory floor. As a rule, the machine controllers in use are not designed to store or transmit data. They usually lack not only the functionality, but also the resources to support this. Therefore, additional edge devices are often needed to collect, analyze and interpret the huge amounts of data that each machine produces on site. For such an edge device, rapid data persistence and ingestion, and efficient data flow from edge-to-edge and edge-to-cloud are at the heart of value creation. The clear separation of machine control and edge data processing unit ensures that there is no risk of unintentional interference with the machine controller. An edge device with a powerful edge database can support multiple use cases on the shop floor today:
1. Operational efficiency
Process optimization along the line to increase quality and reduce damage. When the first machine in a production line uses a new batch of material, i.e. in sheet metal processing, one of the first steps is to cut a sheet to the required size. At this stage, the machine can already detect the differences in the metal compared to a previous batch (deviations are allowed within the DIN standard). With an Edge device this data can be evaluated, and the relevant information passed on to the next machine. With this data machines further down the line can avoid damage / breakpoints of the material.
2. Condition monitoring
Continuous machine condition monitoring reduces downtime and increases maintenance efficiency. A constant stream of high-frequency machine data is compared against the fingerprint of the machine. Any slight deviation is immediately detected and reported. Catching deviations early reduces down-times and costly repairs.
3. Historical Data
Historical data is stored for learning and training to optimize the production line. With an Edge Database, the data is persisted and thus available in the event of faulty behavior. In case of an error, the data preceding the incident can be analyzed and used to find the causes and predict, or even avoid, such an error in the future. Chances are that “fuzzy expert knowledge” already available at the production site can be translated into deterministic rules when tested with these data sets.
The future of Edge Databases
Edge computing provides numerous benefits and enables many applications and functionalities that are only possible with edge computing. However, only a few (usually large) players have been able to create value in edge computing projects, gaining competitive advantages. One reason is a lack of basic edge software. A thriving edge ecosystem necessitates edge software infrastructure that addresses the fundamental recurring needs of edge projects. Edge databases are a critical component in the development of such an ecosystem.
Looking ahead, the emergence of on-device vector databases, coupled with small language models (SLMs), is transforming the landscape of AI applications. These technologies enable AI apps to run directly on edge devices, providing long-term memory, improving performance, and significantly reducing resource consumption. By processing data locally, they eliminate the need for constant cloud connectivity, enhancing privacy and efficiency. Companies like Apple have already embraced on-device AI (Apple Intelligence), showcasing its potential to deliver advanced functionalities seamlessly. This shift represents a game-changer, making AI more sustainable, scalable, and integrated into everyday use.
We use cookies to ensure that we give you the best experience on our website. If you continue to use this site we will assume that you are happy with it.